Tuesday, November 30, 2010

Monday, November 29, 2010
Tuesday, November 23, 2010
drop earrings
How to Make Simple Drop Earrings
 Drop earrings are the easiest earrings to make. You can make them classy with semiprecious stones and silver wire or funky by adding charms and beads.
- Materials and Tools
- Basic Instructions
- Variations
- Learn More
MATERIALS AND TOOLS
Drop earrings are the easiest earrings to make. You can make them classy with semiprecious stones and silver wire or funky by adding charms and beads.All you need for a set of basic earrings:
- 2 headpins or eyepins
- 2 earwires
- beads of your choice
- round-nose pliers
1. Find a Head Pin Head pins have flat heads on the bottom, and are available in different sizes and thicknesses. | 2. Add Beads Put some beads on the head pin. Experiment with different colors and styles. In this picture, spacer beads are used to break up the colored beads. | ||
 | 3. Begin Loop Use a pair of round-nose pliers to bend the head-pin 90º. | 4. Finish Loop Bend the end of the head pin over to complete the loop. Add a french-wire or other earring finding and you're finished. |
Monday, November 22, 2010


Sunday, November 21, 2010
Thursday, November 18, 2010
Collecting And Making Decorative Felt Plate Couples
Just a me thing.
Saw this a it made me remember my parents plates. Silly me I would sneak them off the wall and play with them when I was little :)
C. Dianne Zweig - Kitsch 'n Stuff: Collecting And Making Decorative Felt Plate Couples
 to William and Elizabeth
Saw this a it made me remember my parents plates. Silly me I would sneak them off the wall and play with them when I was little :)
C. Dianne Zweig - Kitsch 'n Stuff: Collecting And Making Decorative Felt Plate Couples
to William and ElizabethMonday, November 15, 2010
Faux Curled Rosewood Wreath
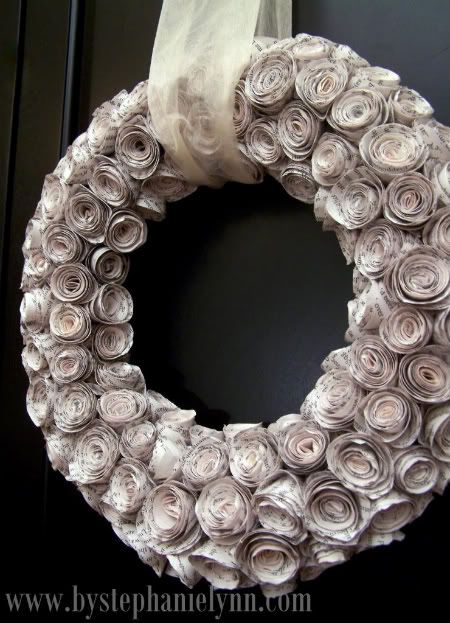
Lovely wreath and a tutorial from this super weblog
Under The Table and Dreaming: DIY Faux Curled Rosewood Wreath {Made From Rolled Recycled Book Pages}
Materials Needed:Foam Wreath Form
Recycled Book Pages
Lots of Hot Glue
Ribbon to Hang
Recycle and Create
Bottles and Bath Salts

Make labels for each bottle
and fill.
Make your own, mix some Epsom salts with a few drops of essential oil like Lavender ("Relax") Orange Blossom ("Recharge") and Sandlewood ("Cheer up").
If you wish use a few drops of food coloring
and fill.
Make your own, mix some Epsom salts with a few drops of essential oil like Lavender ("Relax") Orange Blossom ("Recharge") and Sandlewood ("Cheer up").
If you wish use a few drops of food coloring
Thursday, November 11, 2010


Turkey Place-mat and Silverware Holder
Not sure how to make this, but I had this picture saved on my hard drive :)
Birch Branch Reindeer
![[deerornament.jpg]](http://1.bp.blogspot.com/_YDNppDBRBOY/Sk1h4dyQIbI/AAAAAAAAAgI/XSkuBXhZ2QM/s1600/deerornament.jpg)

Materials (for each)
Birch branch, 2-inch diameter, cut to 4-inch length (body)
Birch branch, 1-inch diameter, cut to 1 1⁄2-inch length (head)
Twigs in varying lengths (for antlers, legs, and neck)
Drill with 1⁄8- and 3⁄8-inch bits
Twine or yarn
Birch branch, 1-inch diameter, cut to 1 1⁄2-inch length (head)
Twigs in varying lengths (for antlers, legs, and neck)
Drill with 1⁄8- and 3⁄8-inch bits
Twine or yarn
Directions
1. Drill four 1⁄8-inch holes into bottom of body for legs; drill two 1⁄8-inch holes in top of head for antlers.
2. Drill 3⁄8-inch hole on top of body and on bottom of head for neck.

3. Insert four legs into drilled holes and secure with glue or hot glue.
4. Trim legs with scissors so that body stands squarely.
5. Attach neck, head and antlers in same way.
6. Knot twine or yarn to form tail and glue onto back of reindeer.


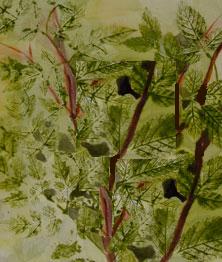
Leaf Painting can done on fabric or any materials that you would like to paint.
You need is:
1. Fabric Paint
2. Brush
3. Leaves (any size and shapes with thick vain)
4. Fabric that you wish to paint.
Thick vein leaves work best.
Now color the leaf on the back side completely.
Now stick the leaves on the fabric and press well.
Dry at least 24Hrs.
You need is:
1. Fabric Paint
2. Brush
3. Leaves (any size and shapes with thick vain)
4. Fabric that you wish to paint.
Thick vein leaves work best.
Now color the leaf on the back side completely.
Now stick the leaves on the fabric and press well.
Dry at least 24Hrs.
Family ties Thankful Tree
 Thankful Tree

Let your family put their gratitude on display with a classic tree of thanks. Your kids can set up the tree ahead of time, then leave out the materials for guests.
- Materials
- Small tree branch
- Flowerpot
- Pebbles, rocks, or marbles
- Card stock or colored paper
- Hole punch
- Twine or string
- Clear holiday lights (optional)
- Instructions
- To make the tree, insert a branch in a flowerpot filled with pebbles, rocks, or marbles. Cut leaf shapes from card stock or colored paper, use a hole punch to make a hole in each, and attach a loop of twine or string.
Leaf Preserving
Preserving Leaves
Preserving leaves from your trees or shrubs is an easy and fun way to make beautiful decorations for your home. The preserved leaves turn a bronze color and look very pretty arranged in a vase.
 ©2007 Publications International, Ltd.Preserving leaves gives them a beautiful bronze color. |
Be sure to ask an adult's permission before you cut any branches from trees or shrubs. You also might use the branches that are cut off when pruning the shrubs in your yard.
What You'll Need:
- Branch cut from a leafy shrub
- Jar or bucket
- Glycerin (available at drug, farm, and garden stores)
Step 1: With an adult's help, mix a solution of one part glycerin and two parts hot water. The amount you mix up depends on how many branches you want to preserve, but you should make enough to cover the bottom of your jar or bucket several inches deep.
Step 2: Cut branches about 18 inches long. Trees or shrubs with firm, waxy leaves work the best.
Step 3: Carefully crush the cut ends of the branches with a hammer, peel away the bark, and stand the branches in the glycerin mixture.
Step 4: Let them sit about three weeks. The branches will absorb the glycerin slowly through the miniature pipelines in their stems. The leaves will turn a bronze color and feel slightly greasy when preservation is complete. Wipe off the ends of the branches, and arrange in a pretty vase.
Another interesting craft that uses leaves is a leaf batik. Keep reading to learn how to create this centuries-old craft.
For more fun nature activities, check out:
Tree Crafts Craft 1 STICK FISH

| Supplies: | sticks leaf twigs wiggle eye glue guns construction paper or cardboard sheet, cut 81/2 X 51/ craft scissors slice of a tree branch or trunk |
Nature Pals
Tutorial from
Personalized Nature Pals | Preschool Crafts for Kids | FamilyFun

Personalized Nature Pals | Preschool Crafts for Kids | FamilyFun
- Materials
- Sticks and twigs
- Hand pruners (a parent's tool)
- Hot-glue gun
- Flat stone
- Colored pencils
- Small objects from nature, such as pinecones, pine needles, pieces of bark, acorns, and leaves
- 8-inch piece of twine (optional)
- Instructions
- Trim the sticks with the pruners and hot-glue them together to form a body with arms, a torso, and legs.
- Draw a face on the stone with colored pencils, then glue it to the torso.
 Glue on the other features, such as pinecone feet, an acorn cap, bark pants, or a pine needle skirt.
- Once the glue has set, you can hang your project5 by tying the twine into a loop, then gluing it to the back.
Kids Crafts | Scout Crafts, Free Printables, Recycled Crafts, and Discount Craft Supplies from MakingFriends.com
Kids Crafts | Scout Crafts, Free Printables, Recycled Crafts, and Discount Craft Supplies from MakingFriends.com
craft project sheets, recycled ideas & free printables plus Discount craft supplies
Examples like this
Butterfly Pony Bead Pattern
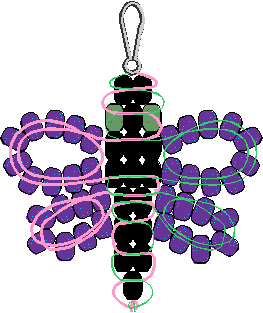
 Basic Instructions:
Fold your cord in half to find the center. Use a half hitch (see detail at right) to secure it to lanyard hook. Lace beads using pattern above as a guide.
craft project sheets, recycled ideas & free printables plus Discount craft supplies
Examples like this
Butterfly Pony Bead Pattern
- 16 Black pony beads
- 36 Blue pony beads
- 2 Green pony beads
- 2 Yards cord
- 1 lanyard hook
Basic Instructions:Fold your cord in half to find the center. Use a half hitch (see detail at right) to secure it to lanyard hook. Lace beads using pattern above as a guide.
Wing Instructions:
After completing the 3rd row string 10 beads on one cord, then loop cord back through all 10 beads to form a stiffer loop. Repeat procedure for the opposite wing. After completing the fifth row of the body, string 8 beads on one cord, then loop the cord back through all 8 beads to form the bottom portion of wings. Repeat for opposite wing. Finish by tying off with a double knot.
After completing the 3rd row string 10 beads on one cord, then loop cord back through all 10 beads to form a stiffer loop. Repeat procedure for the opposite wing. After completing the fifth row of the body, string 8 beads on one cord, then loop the cord back through all 8 beads to form the bottom portion of wings. Repeat for opposite wing. Finish by tying off with a double knot.
How to Make a Twig Star Tree Topper
- Branches
- Hot Glue
- Branch cutters
- Twine
- Scissors
- Cut one twig to be 10 inches long. Take a second twig and cut it to 8 inches long.Cut two final twigs to 6 inches long each.Lay the 10-inch twig on a flat work surface. It should be running vertical.
- Lay the 8-inch twig across the 10-inch twig, running horizontally. This stick should be about 4 inches down from the top of the twig. Use hot glue to hold the stick in place.
- Take one of the inch twigs and glue it in across the center of the twig cross point at a diagonal. Use the hot glue to glue this twig behind the 10-inch stick.
- Glue the final 6-inch twig across the center of the twigs, running in the opposite diagonal from the first 6-inch twig. This twig should be glued onto the front of the star made from twigs.

Subscribe to:
Posts (Atom)