Thursday, March 31, 2011
Wednesday, March 30, 2011
Shall We Make Some Paper Flowers
Paper Dahlia How-To
http://www.michaels.com/Kraft-Paper-Flower-Wreath/e07342,default,pd.html
http://clomid.2010.tedehu.brasilia.me/show_page/how-to-fold-a-paper-flower
http://www.scrappyhabits.com/2009/01/paper-flowers.html
http://printable.tipjunkie.com/spring-flowers/
http://oopsey-daisy.blogspot.com/2010/04/wednesdays-wowzers-3-dozen-flower.html
http://www.amazon.com/gp/product/B0016GMNFW/ref=oss_product
http://greenweddingshoes.com/diy-paper-flower/
http://createaflower.blogspot.com/2011/01/creat-paper-rose.html
Tuesday, March 29, 2011
Man Made Cherry Blossom Branch
)
Here is a pretty tutorial from:
bookhoucraftprojects: Project #53 Cherry Blossom Branch:
What You'll Need
*Tape
*Scissors
*Bare branches
*Vase or frame
Step One:
If you are not using origami paper, cut your paper into squares. I used two different sizes of squares, 3 in. and 2.5 in.
Step Two:
Cut your branches to a size that will suit the frame or vase that your will be using.
Step Three:
Fold your squares into cherry blossoms. You can find out how to fold them
here http://en.origami-club.com/flowers/sakura2/index.html
You can create slight variations in the flowers by the you cut them.
Step Four:
After you have arranged your branches in a vase or frame, attach the folded cherry blossoms to the branches using tape. I happened to have a pink masking tape that matched my paper, but clear tape would also work."
Spring Time anytime Decorating Ideas
  From: Workbook: Shell-Game How-TosFor these projects, you'll need shells, wax paper, clear-drying cement, toothpicks, aluminum foil, tweezers, and nail scissors. Use toothpicks to create tiny dots of cement, spinning the toothpicks to prevent gluey strings. Change toothpicks often, and cap the cement jar between steps.Coquina Butterfly Shells Needed Wings: 1 joined pair of coquina shells (use the prettier side) Body: 1 large sea urchin spine Antennae: 2 small sea urchin spines 1. With a toothpick, dab cement on the underside of the "hinge" between the open wings. Let dry. 2. Dab cement on waxed paper; set the wings on cement. 3. Dot cement on the body, and secure it between wings. Let dry. 4. Dab cement on aluminum foil. With tweezers, drag each antenna through cement, then affix each to the body at an angle. 5. While cement is tacky, use tweezers to lift and spread antennae. Let dry. 6. Peel butterfly off waxed paper. With scissors, trim away excess cement. Cowrie Honeybee Shells Needed Body: 1 asellus cowrie shell Wings: 2 yellow coquina shells Head: 1 small snail shell Antennae: 2 small sea urchin spines Stinger: Larger sea urchin spine 1. Dab cement on waxed paper; set the body on cement. Let dry. 2. Dot cement on aluminum foil. Drag wings through cement, then affix to the underside of the body. 3. While cement is tacky, tilt wings upward. Let dry. 4. Cement head to body. With tweezers, drag each antenna through cement on foil, then affix each to the head. 5. While cement is tacky, use tweezers to lift and spread antennae. Let dry. 6. Glue stinger to the body. Let dry. Peel bee off waxed paper. With scissors, trim away excess cement.  Snail-Shell Snail Shells Needed Body: Snail shell in any color, 1 operculum Antennae: 2 small sea urchin spines 1. Dab cement on waxed paper; set the operculum on the cement. Let dry. 2. Cement the snail shell to the operculum. Let dry. 3. Dot cement on aluminum foil. With tweezers, drag each antenna through cement, then affix each to the body at the head of the snail. 4. While cement is tacky, use tweezers to lift and spread antennae. Let dry. 5. Peel snail off waxed paper. With scissors, trim away excess cement.  Seashell Blooms This technique is used for flowers with flat petals, as well as ones that curl upward. Shells Needed Petals: Sufficient coquina, mussel, or cup shells for a circle Center: Tiny starfish For curled petals: A circular base of heavy-gauge wire, a soda-bottle top, or a ring of aluminum foil For Flat Flower 1. With a toothpick, dot cement on waxed paper. 2. Arrange as many petals as needed in a circle, with each of their tips positioned in the cement. Let dry. 3. Dab cement on a starfish, and affix it at the center. Let dry. 4. Peel bloom off waxed paper. With scissors, trim away excess cement. For Curled Flower 1. Place circular base on waxed paper. Dot cement in the center. 2. Arrange petals in a circle, with their tips positioned in the cement and their other ends elevated by the base. Let dry. 3. Dab cement on a starfish, and affix it at the center. Let dry. 4. Peel bloom off waxed paper. With scissors, trim away excess cement.  | |
For more Link here
Monday, March 28, 2011
Easter Decorating
 Pretty Pressed Flowers
Here's a quick and easy way to enjoy nature's beauty indoors:
1. Snip a few flower blooms, petals, and leaves.
2. Place between two clear glass plates to make an attractive place setting.
3. Beneath the glass plates use solid colour plates and linens to highlight the pretty flowers.
2. Place between two clear glass plates to make an attractive place setting.
3. Beneath the glass plates use solid colour plates and linens to highlight the pretty flowers.
spring inside your house Mother Nature provides us will all kinds of ideas. Celebrate Easter by setting a pretty table that echoes all that you love about spring:
- Start with flowers, a true symbol of new life. Enjoy flower motifs on china, table linens, or enjoy the real deal with a fresh cut fragrant bouquet or arrangement.
- Use wine glasses or goblets as tealite holders or as vases for a single stem flower. Line several down the centre of your table and sprinkle a few jelly beans or chocolate eggs. Add a magnetic butterfly to each glass! (see above)
- Adorn a napkin at each place setting with a small bloom and leaf tied with a pastel ribbon.
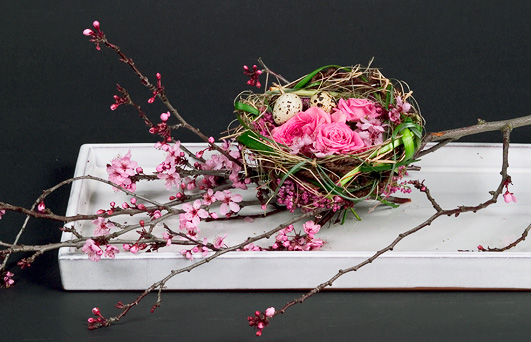
- Nest a few dyed eggs in Easter grass at each place setting. For an authentic robin's egg look, use a tooth brush and brown craft paint to splatter delicate markings on blue dyed eggs.
- Make a nest out of Spanish moss, wrap a single strand of florist wire around the outside edge to help keep it's shape. Add some candy or foil wrapped chocolate eggs.


Garden Craft - Topic Glazing Ball

Lots of things for crafting in the garden.
Ideas and tips that give way to other creative crafts!
Check this out too
Garden Craft - Topic - Associated Content from Yahoo! - associatedcontent.com
Old bowling ball
All-Purpose Construction Adhesive-indoor/outdoor, in desired color
Glass marbles-Michael's or most dollar stores
Small bowl
Paper
Pencil
Instructions to Make Your Garden Gazing Ball:
Once you've found your bowling ball you need to wash it with hot water and soap. Let it dry thoroughly. Apply rubbing alcohol to the bowling ball to remove any residue that is left after washing. Set your bowling ball into a small bowl to keep it from rolling when you are working. Make sure the bowling ball's finger holes are on the bottom.
It's best to plan the design for your Garden Gazing Ball on paper before you start to work on the bowling ball. Draw out flowers, swirls, butterfly, whatever you'd like! It will give you a visual to work from when you are making your Garden Gazing Ball. Let your creativity shine.
You may want to wear gloves as this can be a messy craft project. Start by applying the construction adhesive to a small area on the top of the bowling ball. Set the glass marbles into the construction adhesive to create your design. Keep applying construction adhesive and glass marbles until your Garden Gazing Ball is covered. I leave a small area on the bottom of the Garden Gazing Ball uncovered as it will sit in the dirt there anyways. Let the adhesive dry for several days before putting your Garden Gazing Ball outdoors.
More Pussy Willows
Here is a great tutorial on making a pussy willow display that will last forever...
http://preferablyprim.blogspot.com/
Here's what you need;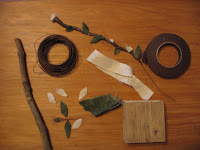
*sturdy branch cut to about 9-10" long
*wire
*florist tape in brown
*strips of green and white fabric for the leaves and blossoms
*wooden base with hole - you need to drill a hole the diameter of the branch
*glue
*brown paint for the base
*wire cutters
Start by cutting out leaves and blossoms and then I cut 10 lengths of the wire which were about 12" long - they need to be a bit longer than the branch in order to twist the wire around the branch to hold them in place.
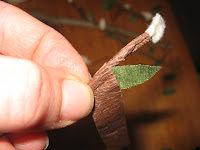 Next cut several lengths of the florist tape and began with a white 'bud' of fabric. I wrapped the tape around the fabric - it helps that the tape is quite sticky, so all you need to do is press it around the fabric very firmly and keep wrapping it around the wire as you work your way up the wire, adding leaves of green fabric as you go.
finished branch

http://preferablyprim.blogspot.com/
Here's what you need;

*sturdy branch cut to about 9-10" long
*wire
*florist tape in brown
*strips of green and white fabric for the leaves and blossoms
*wooden base with hole - you need to drill a hole the diameter of the branch
*glue
*brown paint for the base
*wire cutters
Start by cutting out leaves and blossoms and then I cut 10 lengths of the wire which were about 12" long - they need to be a bit longer than the branch in order to twist the wire around the branch to hold them in place.
 Next cut several lengths of the florist tape and began with a white 'bud' of fabric. I wrapped the tape around the fabric - it helps that the tape is quite sticky, so all you need to do is press it around the fabric very firmly and keep wrapping it around the wire as you work your way up the wire, adding leaves of green fabric as you go.
finished branch

Easter - Easter - Easter
Easter - Easter - Easter Martha Stewart
Need I saw More
Need I saw More
So much to do and so many wonderful ideas and helpful tips, and just lovely reading as always
Thanks to Martha


Sunday, March 27, 2011
How to make a Pussy Willow Decoration
Lovely re-creation of the lovely pussy willow
from: resurrection fern: Salix Caprea / Pussy Willow
Yep once again my small town didn't have the supplies to make this, but I've been working on a creation of my own based on my supplies.
Will post the out-come later!
Wish me luck...
Japanese-Inspired Ornaments
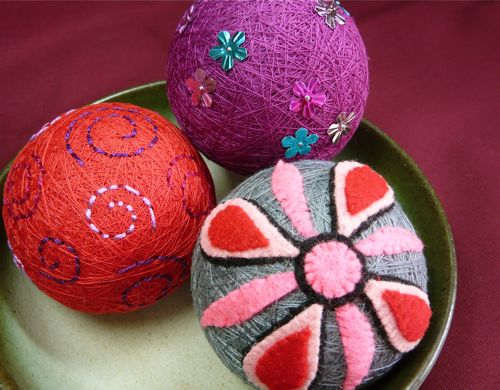
Japanese-Inspired Ornaments from (Gingerbread Snowflakes)
How to Make Japanese-Inspired Ornaments | Gingerbread Snowflakes
Well as I often do I see something great like this after the holiday has gone!
But I think I might be able to tweak it a little and use it for my Spring/Easter decorating!
I'm thing eggs, however in this small town I can't find Styrofoam eggs.....
Decorating With Sticks and Cones
Love this idea from - creative jewish mom:
"Decorating With Sticks and Cones"

"Decorating With Sticks and Cones"
Decorating With Sticks and Cones
You'll Need:
- sticks
- cedar tree pods, or walnuts in their shell
- gold spray paint
- a hot glue gun
- a beautiful ribbon
How To:
- Spray everything gold and then stick it all together with hot glue. Add a nice ribbon.
Decoupage Soap
Plain blocks of soap. Some small stickers or cut out pictures for the decoration. White P.V.A Glue (non toxic) Paint brush
Decoupage soaps are very easy to make and are a great craft for all ages. They are easy to make and can be used to decorate cheap blocks of soaps for school fetes or fundraisers.
Use Christmas images for your guest bathroom or how about a picture of your child so he or she knows which soap is hers on school camps.
To start this craft choose a image. Use stickers or cut outs to go onto your soap. Take the back of the image and using the PVA glue adhere it to the block of soap.
PVA glue is poly vinyl acetate a white craft glue that dries clear.
Using the paint brush place a layer of glue over the top of the image and the top of the soap. Allow the coat to dry and then apply another coat. Make sure you cover the complete image.
Keep doing this until you have at least 5 coats of PVA glue onto your soap. Allow it to dry each time.
The more coats you apply to the soap and image the longer the image will stay visible in the shower or bath.
To use this soap all you do is wash with it like normal, taking preference to the side with out the image.
This craft is totally safe and Non Toxic. The glue layer containing the glue and image will simply peel away from the soap as the soap is finished.
Saturday, March 26, 2011
V and Co.: V and Co how to: jersey knit bracelet
Link to V and Co.: V and Co how to: jersey knit bracelet
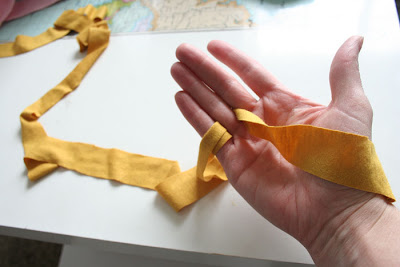
You will need approx three strips of jersey knit fabric cut to 1" each with the length of at least 58"
(Or an old tee shirt maybe)
Here is the very nicely detailed tutorial from (V and Co)
"2nd you will need your fingers. that's it, oh and a pair of scissors."
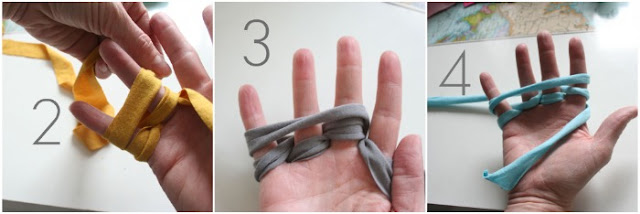 how many fingers you use will determine how thick your bracelet will end up. i'll go into more detail on the 4 and 2 fingers...i'm assuming you can figure out 3 fingers! personally my favorite one is the 2 finger one...it's the perfect thickness in my eyes.
 okay...
*first you are going to take your 1" strips and cut on your ends a 1/4" slit.
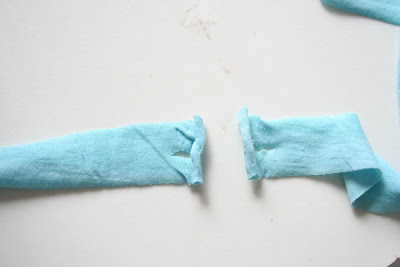
 *next take your slits and line them up ends together like the picture above.
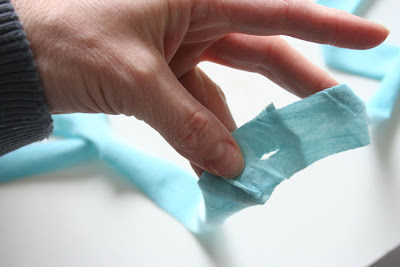
 *now take your bottom strip and pull it through the slits from TOP to bottom
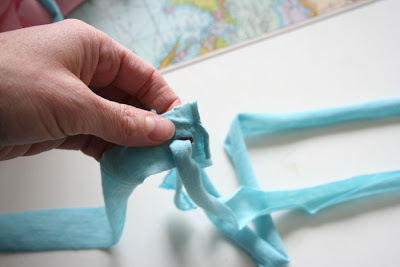
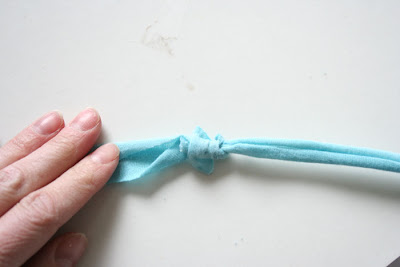 *gently pull till you get a little knot.
 now a lot of you will go back in time with me and totally remember doing this with yarn when we were in grade school or somewhere along that time. dont' know if it was a california thing cause i asked my friend who grew up in florida what i should call this and she was like "what are you talking about? i've never made those."
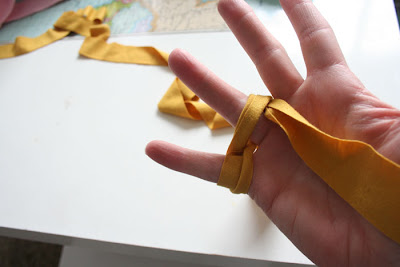
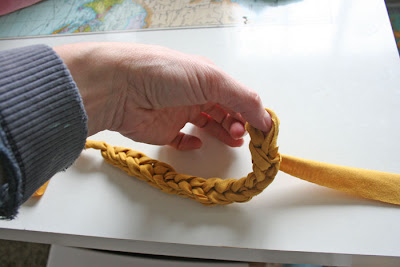
*with your connected strips we are now going to weave the strip in and out of our fingers.
use the next set of pictures as a guideline (next set of pictures are for 4 fingers):
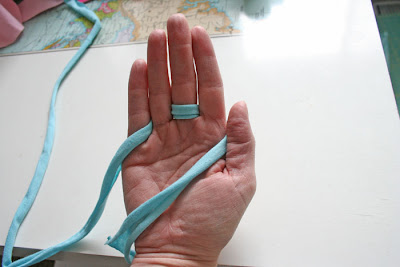
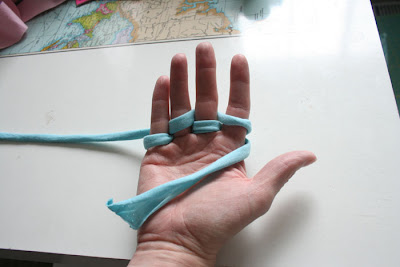 *you should now have all fingers "weaved upon" (ha!)
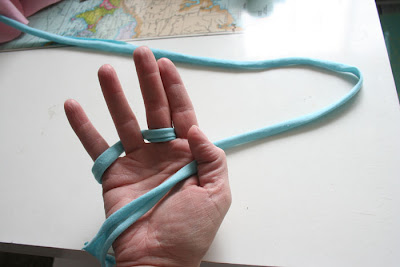
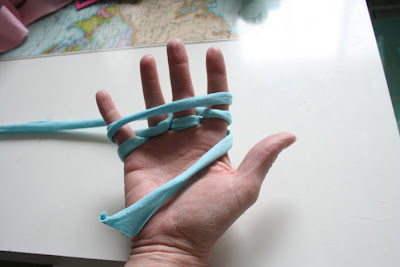 *bring one big loop around to face you (from the pinky to pointer)
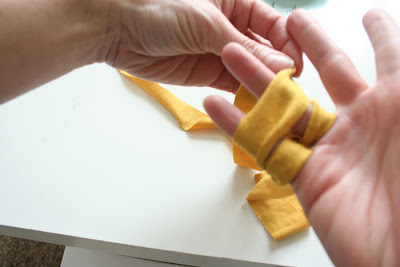
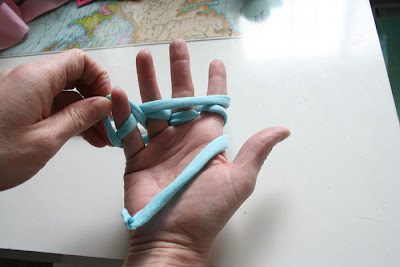 *take your weaved loops and go over your finger and big loop like the picture above.
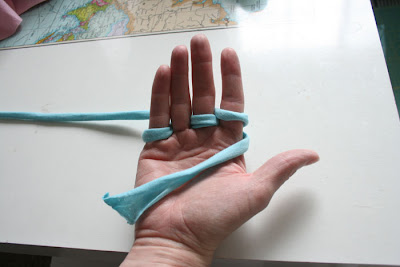
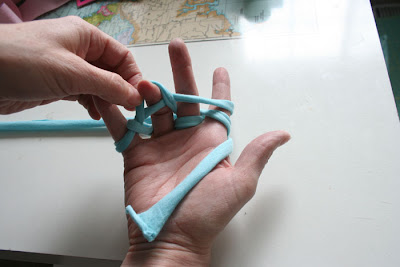 *continue to do so with all the fingers going in order.
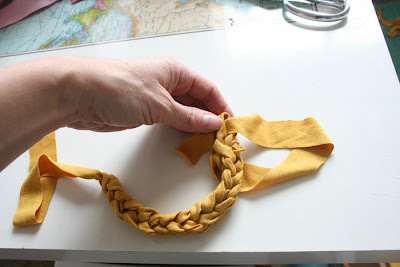
 *when you get to the end, or at the end of your first chain (at your pointer finger) make a new loop and start the process all over again!
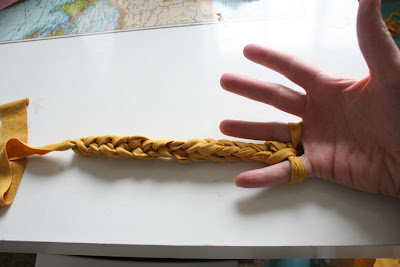
* once you get like 6 chains done, take your starting tail and gently pull (while your chain is still securely placed on your fingers!) so that you can get a good feel as to how long you need to make your chain, depending on your wrist size.
now let me show you real quick how to make a two finger chain then we will proceed on how to finish your chain and how to tie it off:
 **because you are using less fingers you will need less strips. i just used 2 strips when i made my 2 finger bracelet
*just like the 4 finger chain start with a small tail (of at least 4 inches)
*starting on your ring finger, weave behind (your ring finger) and then in front of your pinky.
 *then come back and loop back in front of your ring finger.
 *come back around from behind (from the pinky side) to the front to make a big loop.
 *repeat the steps i showed you while doing the 4 finger bracelet.
*remember to pull your tail so it makes the chain more defined and it gives you a better idea of how long you need to make your chain.
 *once you've determined you have a long enough chain, carefully pull the loops off your fingers, making sure you don't undo any of the chain by losing the loops!
 *slip the extra tail into both loops.
*pull all the way through, and gently tug the end.
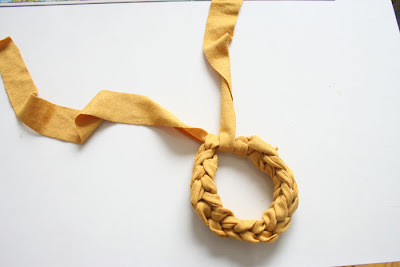 *tie off your bracelet with a knot.
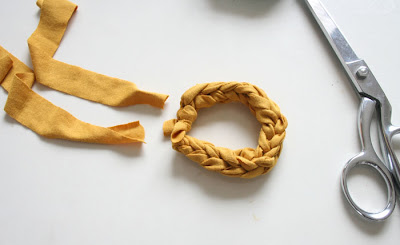 *cut off excess tails!
You will need approx three strips of jersey knit fabric cut to 1" each with the length of at least 58"
(Or an old tee shirt maybe)
Here is the very nicely detailed tutorial from (V and Co)
"2nd you will need your fingers. that's it, oh and a pair of scissors."
 how many fingers you use will determine how thick your bracelet will end up. i'll go into more detail on the 4 and 2 fingers...i'm assuming you can figure out 3 fingers! personally my favorite one is the 2 finger one...it's the perfect thickness in my eyes.
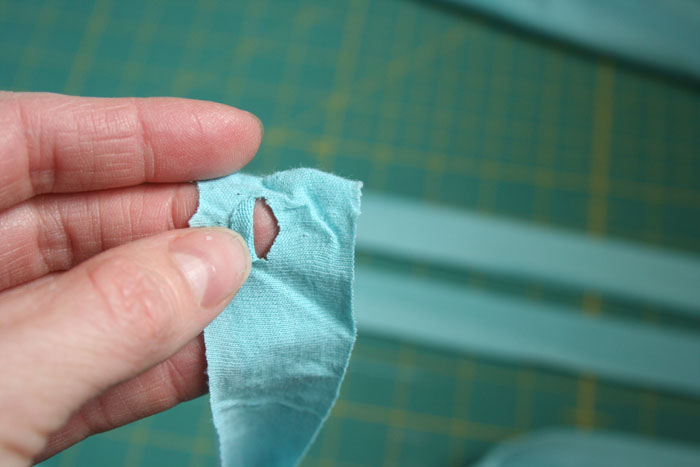 okay...
*first you are going to take your 1" strips and cut on your ends a 1/4" slit.

 *next take your slits and line them up ends together like the picture above.
 *now take your bottom strip and pull it through the slits from TOP to bottom
 *gently pull till you get a little knot.
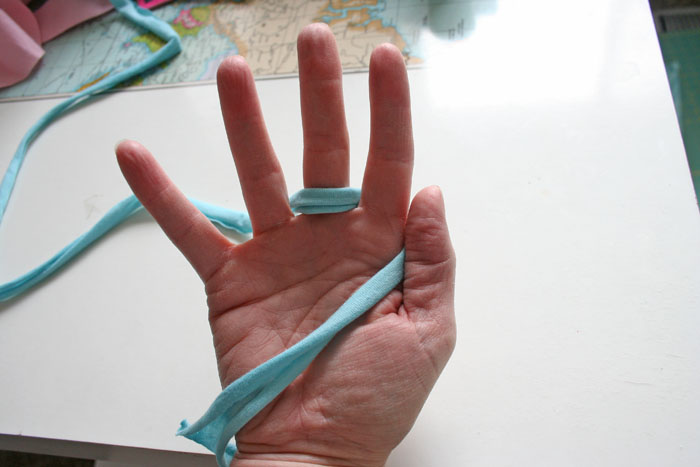 now a lot of you will go back in time with me and totally remember doing this with yarn when we were in grade school or somewhere along that time. dont' know if it was a california thing cause i asked my friend who grew up in florida what i should call this and she was like "what are you talking about? i've never made those."
*with your connected strips we are now going to weave the strip in and out of our fingers.
use the next set of pictures as a guideline (next set of pictures are for 4 fingers):


 *you should now have all fingers "weaved upon" (ha!)
 *bring one big loop around to face you (from the pinky to pointer)
 *take your weaved loops and go over your finger and big loop like the picture above.
 *continue to do so with all the fingers going in order.
 *when you get to the end, or at the end of your first chain (at your pointer finger) make a new loop and start the process all over again!
* once you get like 6 chains done, take your starting tail and gently pull (while your chain is still securely placed on your fingers!) so that you can get a good feel as to how long you need to make your chain, depending on your wrist size.
now let me show you real quick how to make a two finger chain then we will proceed on how to finish your chain and how to tie it off:
 **because you are using less fingers you will need less strips. i just used 2 strips when i made my 2 finger bracelet
*just like the 4 finger chain start with a small tail (of at least 4 inches)
*starting on your ring finger, weave behind (your ring finger) and then in front of your pinky.
 *then come back and loop back in front of your ring finger.
 *come back around from behind (from the pinky side) to the front to make a big loop.
 *repeat the steps i showed you while doing the 4 finger bracelet.
*remember to pull your tail so it makes the chain more defined and it gives you a better idea of how long you need to make your chain.
 *once you've determined you have a long enough chain, carefully pull the loops off your fingers, making sure you don't undo any of the chain by losing the loops!
 *slip the extra tail into both loops.
*pull all the way through, and gently tug the end.
 *tie off your bracelet with a knot.
 *cut off excess tails!
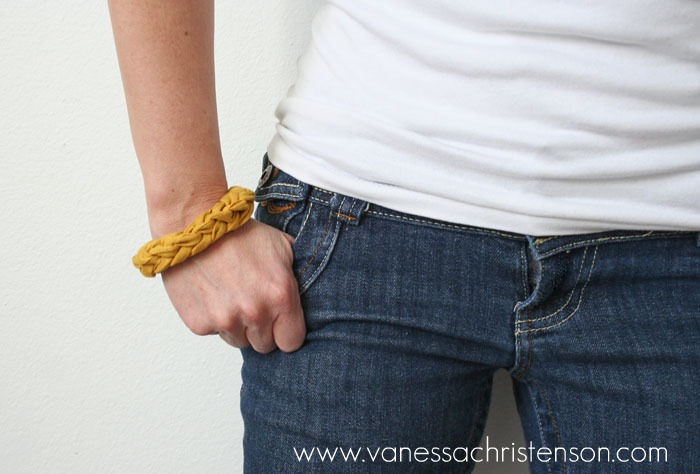
Thursday, March 24, 2011
Flickr: saltycotton's Photostream
A personal pick of mine
Because I love all the cool vintage clip art and history in the steam
Flickr: saltycotton's Photostream
Because I love all the cool vintage clip art and history in the steam
Flickr: saltycotton's Photostream
Free Easter Wreath Tutorials FROM (Tipnut)
Free Easter Wreath Tutorials FROM (Tipnut)
This web site is pretty nice! They offer a lot.
Hundreds of free craft ideas, printables and recipes that help make this year's holiday special.
More More More
This quote from (Tipnut) says it all.
"This website began in the Fall of 2006 as a way for me to organize all the creative homemaking tips, crafts and projects I have collected over the years. It has grown to feature all the cool ideas and projects that I've discovered online (one of the most popular features of Tipnut)."
Free Easter Wreath Tutorials : Easter.Tipnut.com
Tissue Paper Flowers For Easter or Any-time
A twist on Martha Stewart's pom poms
 Layer 8 and 10 squares of paper, depending on how puffy you want the flower to be.
LINK -how-to
First thing cut out 6-to-8 inch squares of tissue paper.
Layer 8 and 10 squares of paper, depending on how puffy you want the flower to be.Accordion-folded the tissue paper and then twist floral wire around the middle of the paper.
Then pull out the ends, like a bow.
Finally carefully pull out each layer, twisting it as I separated it.
See Martha's link for the tutorial for pom poms and tweak it to your own taste.
LINK:
LINK -how-to
Decoupage Birdies Cheep Cheep
One yard sale bird on a wire or one dollar Tree bird decoration...
Simple application of your choice of paper and walla ...
Ink Stains: Mystery Technique ~ Flower Soft Faux Pussy Willow!
I just love In Stains
she has so so much great stuff.
Like this
Ink Stains: Mystery Technique ~ Flower Soft Faux Pussy Willow!
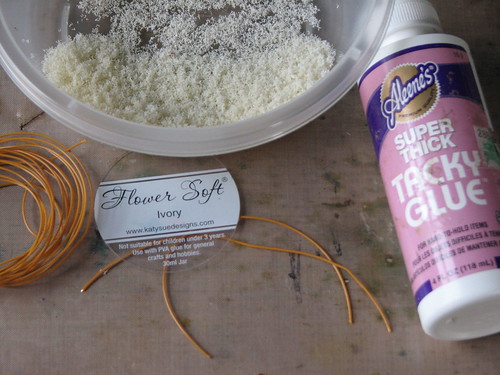
Supplies:
Flower Soft - Ivory
Butterscotch Coated Wire or Plain Wire
Aleene's Super Thick Tacky Glue (or Flower Soft Glue)
Grapevine Wrapped Wire (found in the Floral areas)
Instructions:
1. Cut several pieces of wire 3-5" long. You will need two pieces for each catkin you want to make.
2. Twist two wires together...
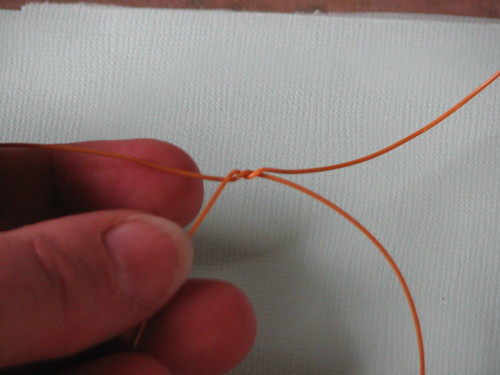
Turn and twist the opposite two wires together...
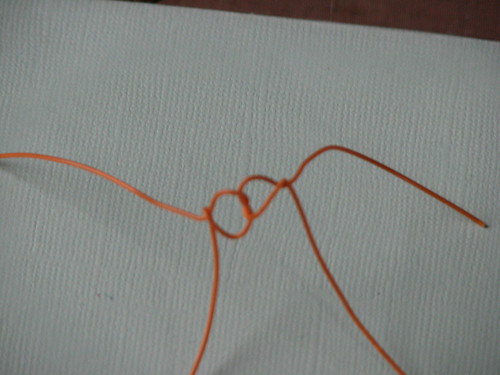
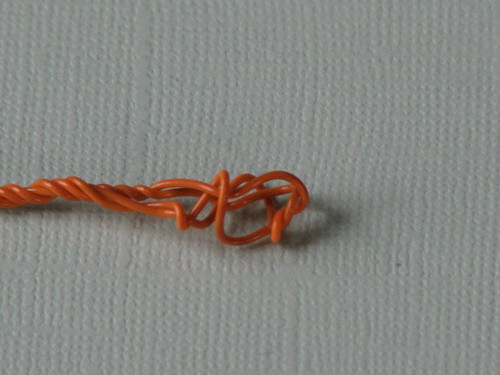
Turn one more time and twist the original wires together then bring all of the wires together and secure at the bottom. You're basically making a little oval cage for the glue & Flower Soft. Be sure to make several sizes since real catkins come in all sizes.
When you're finished twisting the wire it should look similar to this....
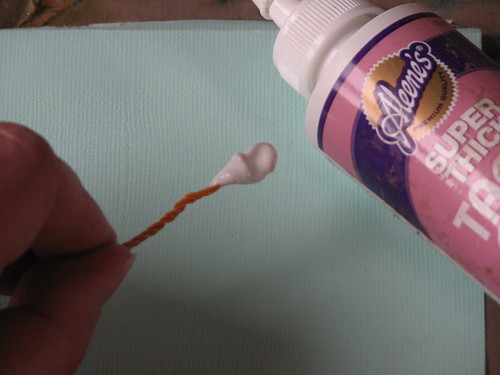
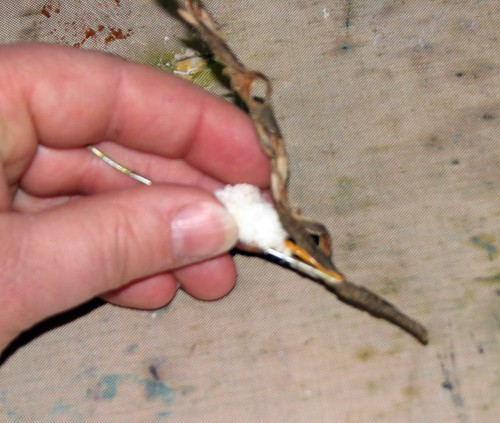
3. Now coat the entire end in glue as shown...
4. Coat with the Flower Soft. I like to add lots so the catkin is very full.
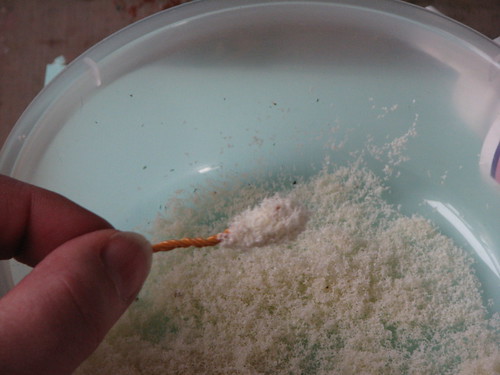
5. Let the glue/Flower Soft dry standing up. I use a foam piece that some decorative brads came in for this step.
6. Cut a length of the grapevine wrapped wire. Saturate with water and let it soak in for several minutes. This will help with the next step.
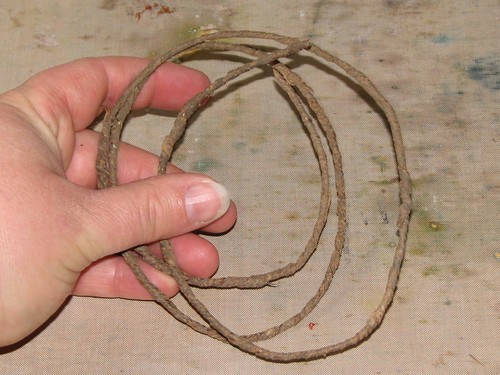
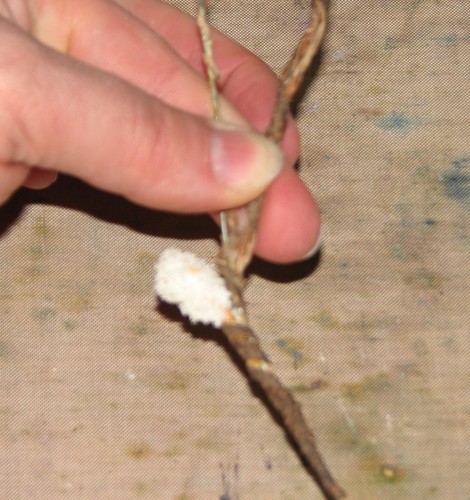
7. After the grapevine has softened up, carefully unwrap the grapevine from most of the wire. Leave the bottom 2-3" in tact.
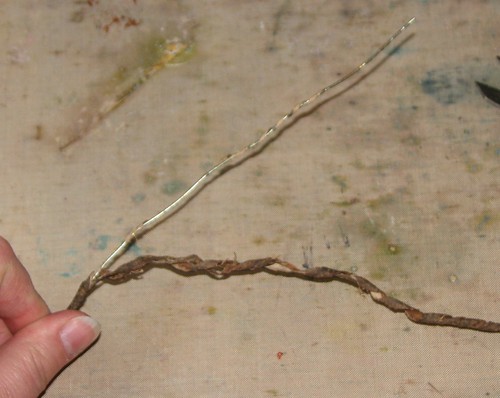
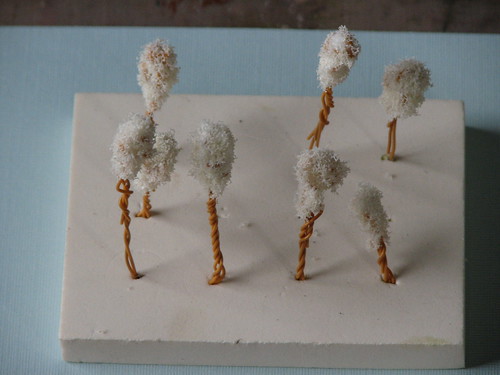
8. Place a larger catkin along the base of the wire. Re-wrap the grapevine around the catkin wire and the base wire tightly. This will hold everything together and cover the catkin wire.
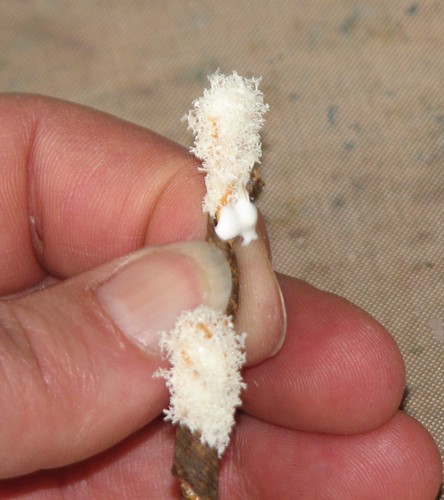
9. Continue wrapping and inserting additional catkins (working from large to small) up the branch. When you do so remember to vary the placement of the catkins. They don't naturally grow in a straight line up the branch.
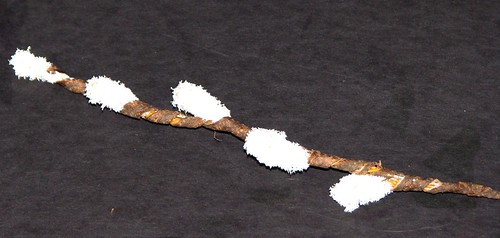
10. When you reach the top...snip off any extra branch wire". Secure the grapevine to the branch using the Super Thick Tacky Glue. Hold with a cloths pin if necessary until dry.
she has so so much great stuff.
Like this
Ink Stains: Mystery Technique ~ Flower Soft Faux Pussy Willow!
Flower Soft Faux Pussy Willow
A bit about some of the supplies I used...I started off using the butterscotch colored wire because some varieties of the pussy willow has a yellow cast to it. You could use brown, copper or plain wire ~ it's totally up to you. The wire I used for the branches is some awesome stuff. I found mine at Michaels but I'm sure they have it many places in the floral section.
Supplies:
Flower Soft - Ivory
Butterscotch Coated Wire or Plain Wire
Aleene's Super Thick Tacky Glue (or Flower Soft Glue)
Grapevine Wrapped Wire (found in the Floral areas)
Instructions:
1. Cut several pieces of wire 3-5" long. You will need two pieces for each catkin you want to make.
2. Twist two wires together...
Turn and twist the opposite two wires together...
Turn one more time and twist the original wires together then bring all of the wires together and secure at the bottom. You're basically making a little oval cage for the glue & Flower Soft. Be sure to make several sizes since real catkins come in all sizes.
When you're finished twisting the wire it should look similar to this....
3. Now coat the entire end in glue as shown...
4. Coat with the Flower Soft. I like to add lots so the catkin is very full.
5. Let the glue/Flower Soft dry standing up. I use a foam piece that some decorative brads came in for this step.
6. Cut a length of the grapevine wrapped wire. Saturate with water and let it soak in for several minutes. This will help with the next step.
7. After the grapevine has softened up, carefully unwrap the grapevine from most of the wire. Leave the bottom 2-3" in tact.
8. Place a larger catkin along the base of the wire. Re-wrap the grapevine around the catkin wire and the base wire tightly. This will hold everything together and cover the catkin wire.
9. Continue wrapping and inserting additional catkins (working from large to small) up the branch. When you do so remember to vary the placement of the catkins. They don't naturally grow in a straight line up the branch.
10. When you reach the top...snip off any extra branch wire". Secure the grapevine to the branch using the Super Thick Tacky Glue. Hold with a cloths pin if necessary until dry.
Subscribe to:
Posts (Atom)