Tuesday, July 5, 2011
Tuesday, June 7, 2011
3-D Arts and Crafts Project
"Materials
CDs
Glue dots
String
Markers
Suction cup with hook
An assortment of permanent markers
Directions
Each teen will need two CDs, four glue dots, one 24” piece of string, markers, one suction cup, and an assortment of permanent markers. They will follow these instructions to create their CD Sun Catcher."
Easy Wind Mobile to Make From: ZiggityZoom.com

Find a twig that is about 10-12 inches long. Peel any loose bark from twig and rinse off any dirt.
Tie a piece of string ( 18-20 ' long) to both ends of the twig, to use as the hanging portion of your mobile. Tie a loop in the exact center section of the string.
Cut 4 streamers that are 18' long. We cut thin streamers from craft foam. Loop into center of washer and tie off.
Cut 4 pieces of string, 12-14' long, and tie one end of each to the twig, spacing equally apart.
Attach Washers to string, tying securely. Alternate washers, so that one is higher, the next a little lower, etc. But be sure that washers are close enough in length so that they will bump into each other in the wind.
Dab a little of the glue onto each knot that you have tied and let dry thoroughly. Trim ends of knots, leaving a tiny bit of a tail.
Hang your Wind Mobile in a place where you can watch it and hear it.
Need:
Twig, 10-12 inches
String
Glue
Fender Washers (4) 1 1/2' wide
Streamers (made from Ribbon or craft Foam sheets)"

Wednesday, June 1, 2011
Cool Light
Straw light
 Great Light by Mark Montano


You'll need:
1 cheap deep-fryer (I got this one at a discount store for 99c)
500 drinking straws
1 plug in light fixture with a chandelier bulb sized socket
Here's how:
Step 1: Bend your straw in half and poke it through the inside of the deep-fryer so that the bend in the straw wraps around a wire.
Step 2: Continue this process until your entire deep fryer is filled with straws and then bend the handle toward the inside.
Step 3: Attach your socket and bulb inside the handle so that it's secure. The bulb should be big enough to be wedged inside the loop of the handle so that it doesn't move and does not touch the straws.
From more here is Mark's Link

Tuesday, May 31, 2011
Fourth of July Crafts for Klutzes - Associated Content from Yahoo! - associatedcontent.com
Fourth of July Crafts for Klutzes - Associated Content from Yahoo! - associatedcontent.com: "Make a cute patriotic box. First, find a box with a separate lid such as an ice cream box. Using a small paintbrush, paint the entire box and lid white with acrylic paint. Set the lid to the side. When the white paint dries, dip a large scruffy brush in red paint and wipe off most of the paint with a paper towel. Paint the box red; it should look streaky. Now repeat using the blue paint on the lid. When the box and lid are dry, dip three rubber stamps which spell out 'USA' into white paint and stamp them on the box. Use white paint and a star stamp on the lid. Again when everything dries, seal the box with spray matte acrylic. It's just that easy. And of course, you can use other stamps if you so desire."

Friday, May 20, 2011
seaglass earings
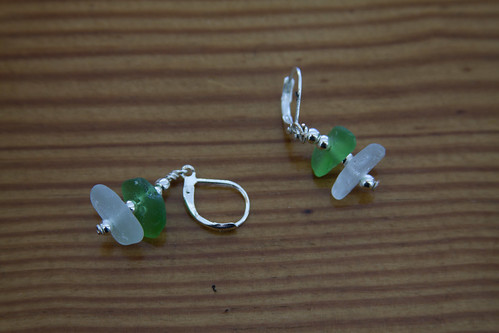 Not sure how to do this, but it's another cool goal. I love
sea-glass, and have been making faux sea-glass also.


Monday, May 16, 2011
mushrooms
 First find some large screws and paint them . Next, find a fallen tree branch, thick enough to hold the mushrooms
I plan on also adding moss...
Child Arts and Crafts Idea: MUSHROOM
You'll need:


 "
"
- egg-box (a cup and a peak)
- all purpose adhesive
- red and white acrylic paint
- a stick
- scissors
"Sunday, May 1, 2011
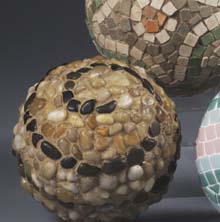
Pebbled Garden Decoration | FaveCrafts.com
Pebbled Garden Decoration | FaveCrafts.com: "Materials:
STYROFOAM™ Brand Foam:
Ball, 5'
Small, river-washed pebbles (available by the bag in craft stores)
Latex adhesive for ceramic tile
Sanded tile grout
Acrylic exterior satin varnish
Black fine line permanent marker
Ruler
Palette knife
Disposable bowl, small
Bucket of water
Household sponge
Soft, clean rag
Rubber gloves"
Steps:
- Sort pebbles into dark and light piles.
- Use marker to draw spiral around foam ball, from top to bottom, or draw custom pattern.
- Use palette knife to spread 1/8"-thick layer of tile adhesive onto small area of ball, along marker line. Note: Rest ball in small bowl while working to prevent rolling.
- Firmly press one or two rows of black pebbles into adhesive along entire marker line, placing pebbles close together; add adhesive as needed. Repeat, filling remaining spaces with light-colored pebbles for contrast; let dry completely.
- Following manufacturer's instructions, mix grout. Put on rubber gloves. Use tip of damp sponge to rub grout into spaces between stones. As you work, remove excess grout from stones with clean side of sponge. Note: If using sanded grout, rinse tools in bucket, not sink; discard water outdoors.
- When ball is completely grouted, wipe away excess once more using damp sponge. Let ball dry slightly. Repeat sponging until stones are clean.
- When dry, rub ball with clean rag to remove grout residue and restore shine.
- If using outdoors, follow manufacturer's instructions to apply one or more coats of sealer to ball.
®™ Trademark of The Dow Chemical Company ("Dow") or an affiliated company of Dow.
For more project ideas, please see styrofoamstyle.com.
For more project ideas, please see styrofoamstyle.com.
Saturday, April 30, 2011
PINE CONE BALL
PINE CONE BALL

(This craft was purchased, but the concept is fairly easy to replicate.)
| Supplies: | Styrofoam ball, 3 or 4 inches in diameter Numerous small pine cones of different varieties (These can either be found in nature or purchased at a craft store.) Glue guns Pruning Shears or other sharp scissors to cut the pine cones |
A string to hang the ball can be made of cord, ribbon or twine.
Monday, April 25, 2011
Easter Crafting Goals Missed a Few
I will try to wrap up some things and save others for next year...
I still have the fair to add some of my Spring stuff to.
Time to re-organize!
I still have the fair to add some of my Spring stuff to.
Time to re-organize!
Saturday, April 23, 2011
SALT CRYSTAL GARDEN
 THE SALT CRYSTAL GARDEN
RECIPE
In a glass or plastic bowl, put some pieces of coal, coke, porous brick, tile, cement or sponge.
Day 1: Over the base material, pour two tablespoons of water, two of table salt (iodized or plain)
and two of Mrs. Stewart’s Bluing.
Day 2: Add two more tablespoons of salt.
Day 3: Pour into the bottom of the bowl (not directly on the base material) two tablespoons each of
salt, water, and Mrs. Stewart’s Bluing, and then add a few drops of mercurochrome, vegetable
coloring or ink to each piece.
By this time a beautiful flower-like growth should have appeared. If all the conditions are
Wednesday, April 20, 2011
Mother's Day Poems - From ~ Mothers Day Central
Need Ideals and more look at this from Mothers Day Central
101 Mother's Day Poems
To help you find just the right words, we've categorized our list of 101 Mothers Day poems into nine different categories:
Mother's Day Poems - Find a Mothers Day Poem for Your Special Mom ~ Mothers Day Central
Tuesday, April 19, 2011
Easter Bunny Candy Bar Wrappers ~ Be Different...Act Normal
Happy to see this great post from ~ Be Different...Act Normal
Easter Bunny Candy Bar Wrappers ~ Be Different...Act Normal
Easter Bunny Candy Bar Wrappers ~ Be Different...Act Normal


Saturday, April 16, 2011
Recycle wreath any time!
This can work for other seasons as well. Just tweak it a little and spray paint it.
See their we site for more details.
Uncategorized | Happy Simple Living: "Make Your Own Thanksgiving Decoration From Yes, Toilet Paper
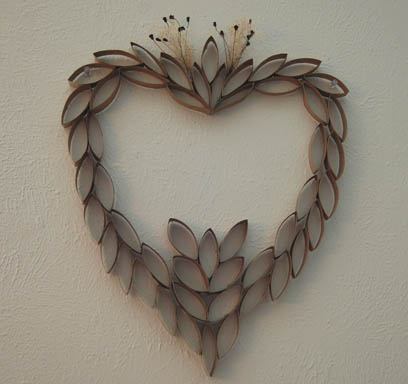
Tubes
BY ELIZA_CROSS, ON NOVEMBER 23RD, 2009%
I promised to give you the details about the green craft project I did during my Staycation, so here you go. I first saw the idea of using toilet paper tubes to make art on the Growing Up Creative Blog. You’re not going to believe what a pretty decoration you can make from such humble materials!
This heart is made from about 8 empty rolls, each flattened and cut in 6 pieces:"
See their we site for more details.
Uncategorized | Happy Simple Living: "Make Your Own Thanksgiving Decoration From Yes, Toilet Paper
Tubes
BY ELIZA_CROSS, ON NOVEMBER 23RD, 2009%
I promised to give you the details about the green craft project I did during my Staycation, so here you go. I first saw the idea of using toilet paper tubes to make art on the Growing Up Creative Blog. You’re not going to believe what a pretty decoration you can make from such humble materials!
This heart is made from about 8 empty rolls, each flattened and cut in 6 pieces:"
Friday, April 15, 2011


Tuesday, April 12, 2011
Missing to Kissing/Puzzle Pretty Cool

Pretty Cool
How to Make a "Missing to Kissing" Puzzle from a Straw: 8 steps (with pictures) - wikiHow
This Japanese puzzle represents two separated lovers (the little beads) who wish to be reunited. Their journey begins at opposite ends of the puzzle and it's up to you to reunite them.
You can make this puzzle using just a plastic straw, two plastic beads and a piece of string. While it's simple to make, it's fairly difficult to solve! Your objective is to bring them together on one side without untying the string, and let them kiss.
Click here for full tutorial
Click here for full tutorial
Monday, April 11, 2011
How to Make Mold-Resistant Paste
Instructions
things you'll need:
- White flour
- Water
- Salt
How to Make Mold-Resistant Paste
- 1Pour some plain white flour into a bowl. The amount of flour does not need to be measured because the amount of water you use will vary depending on the desired consistency for your paste.
- 2Add 1 tbsp. of water at a time, mixing the paste with a wooden spoon or an electric mixer. A wooden spoon will be sufficient until the mixture becomes more liquid -- then you will need an electric mixer to smooth out any lumps.
- 3Continue to add water, mixing thoroughly, until your paste reaches the desired consistency. If you want a thicker paste, add water until the mixture reaches the consistency of pancake batter. If you prefer to work with thinner paste, keep adding water until the mixture becomes very runny and almost resembles watered-down milk.
- 4Add 1/2 tbsp. of salt for every cup of flour used in the paste and mix it in well. The salt should help to prevent mold as your paper-mache dries because it will suck up some of the extra moisture.
How to Keep Paper Mache Sculptures from Molding
- 1Squeeze as much excess water from your paper-mache pulp as you can before you begin your sculpture.
- 2Place drying sculptures in a warm oven (no hotter than 200 degrees Fahrenheit) or near a heater or radiator. The heat will help moisture to evaporate more quickly and the sculpture should dry well without molding.
- 3Allow the sculpture to dry completely before adding any paint or finish. If the paper-mache is still damp when a layer of paint is applied, the sculpture may begin to mold from the inside layers out.
- 1
Read more: How to Prevent Paper-Mache From Molding | eHow.com http://www.ehow.com/how_8037537_prevent-papermache-molding.html#ixzz1JFovoqpl
Subscribe to:
Posts (Atom)